I hate wearing high-water pants! I did it enough growing up the middle child of 7, often getting hand-me downs from my older sisters (who are now 5 inches or so shorter than I am). I have a lot of gripes about ill-fitting clothes... Back in the 90's, when I was in grade/high school, pants were not so tight and fitted. Straight leg pants were fashionable and I loved them (still do). I didn't have money to buy jeans from department stores (which sometimes only have a limited selection of styles in my size). I used to buy 2-3 sizes too big so my pants reached my ankles although they sat low on my hips and hung low in the crotch. Not very flattering but I did the best I could. I hated that when I sat down my pants rode up really high because the length was in the crotch.
Now jeans are fitted and flared and if I can find a pair in my size they do look rather cute (nevermind skinny jeans... that's for another blog). The pant legs are actually longer to accommodate short girls who wear tall shoes. The length is added to the calf but not the thigh. I've bought a few pairs, and I was so excited they were long enough, but then my
pants constantly pull down at the waist because they don't have enough
slack in the thighs. So even though I wear probably a 34" inseam, some styles I have to get a 36" inseam because that is the size that they change from 'average' to 'tall' fit and add length to the thigh. Then I have to take off some length or roll them up (which I don't mind at all!)
 |
| My daughter's lengthened hand-me down jeans. I vowed that my kids won't have to wear high-water pants. Even though I won't turn down free hand-me downs. I added coordinating patches to the knees on one pair. |
So I have a few pairs of jeans that were not too fitted that I bought, thought they were perfect, and then I washed them and they shrunk.
Since losing my baby weight these past few months, I've been pulling out all my thin wardrobe and getting excited that I can wear them again. I liked the fit of these 2 khaki pairs of pants but always wore them with hiking boots to hide the short length. I decided to fix them since I live in a hot climate now and don't wear boots as much (when it's cold 8 months out of the year you have plenty of excuses to wear boots).
Since losing my baby weight these past few months, I've been pulling out all my thin wardrobe and getting excited that I can wear them again. I liked the fit of these 2 khaki pairs of pants but always wore them with hiking boots to hide the short length. I decided to fix them since I live in a hot climate now and don't wear boots as much (when it's cold 8 months out of the year you have plenty of excuses to wear boots).
I decided I'd add length to them after I'd done this to a few pairs of my 3 now 4 y.o. daughter's pants. It is actually very easy. Just follow along with my photos.

1. Un-pick the bottom hem of your pants/jeans. See before and after above. [I always use an un-picker. If you don't have one check them out at the fabric store.]
Try the pants on after unpicking and ironing out the hem. If you only need to add about 5/8" to the bottom and length A is long enough, then whatever fabric you use to lengthen them will not show. If you want them as long as B or longer, you will want to pick something that blends nicely or looks good on the bottom of your pants.
***I now have an easier method for steps #2-5 see my 'Update' at the bottom. If you are adding denim or heavier fabric to lengthen the pants continue with the original tutorial because it allows you to fold open the seam as shown in step 2) So there is less bulk to sew through for the next steps. ***
***I now have an easier method for steps #2-5 see my 'Update' at the bottom. If you are adding denim or heavier fabric to lengthen the pants continue with the original tutorial because it allows you to fold open the seam as shown in step 2) So there is less bulk to sew through for the next steps. ***

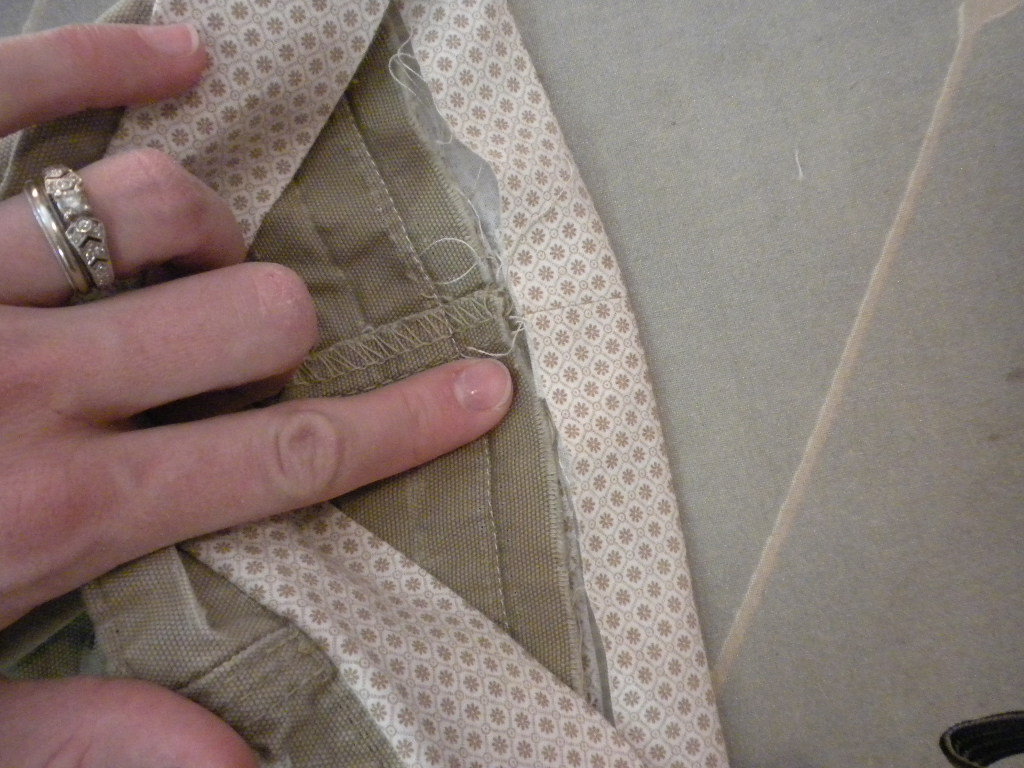
2. Take some scrap fabric folded in half (wrong side out) and cut it so it is 5/8 inch wider than your pant leg and an inch or so longer than the length of all the material in the hem. See how I folded/pressed the seam allowance on the left: that is where you want to sew first in the next step.

3. Stitch in the ditch (where you folded/pressed the seam allowance). Make sure you have the right sides together. Open it up and press the seam flat.

4. Turn your pants inside out. Put your fabric loop inside the pant-leg and pin it right sides together to the pants. Pin on the outside. I lined my fabric's seam up with the inner seam of the pant-leg.

5. Put your pant-leg over the free arm of your sewing machine and stitch in the ditch of the bottom fold of the hem.
6. Take the pants off the machine and turn the right side out again. Roll the fabric inward about 5/8" and press.


 |
| Perfect length. I know it doesn't seem like much but it's the difference between me loving to wear these pants, versus them feeling a little dorky. |
 |
| I should do a tutorial on doing your own pedicures... another day... :o) |
Perfect length and I like the distressed look on the bottom although they are actually nicely reinforced with the fabric underneath. If these pants were lengthened before they were worn they would just look like they have a stylish 1 to 1-1/2" hem. Which if you buy a wider hemmed pant you have even more length you can roll out.
 | |
| They look uneven only because I'm twisting around to take a picture. |
These are my Silver Jeans khakis. Because they are a little dressier than the women's jean-cut Carharts (pictured above) they look cute with the fabric showing at the bottom. Which is good because they needed that extra length because they were super-dorky short.

I love these pants and I love that after spending an hour cutting and stitching I feel like I have 2 new pairs of pants (because now I'm wearing them again).
***UPDATE***
I'm now altering for my husband, daughter, and 3yr-old son too. Lately I've been skipping the seam in step 2-3 and just fold over one side and overlap the ends so the fold is on the outside... see steps below. When I stitch it to the pants in step C it looks like it was sewn first. Being such a short seam it doesn't have a chance of coming undone because it's held down by the sewing in the latter steps. I don't bother with an iron until the end and I don't have to really measure. I recommend this method because it's faster for kids' lighter weight pants or when adding lightweight fabrics for the length). If adding denim or a similarly heavy fabric follow the original steps above. The original method also looks a little more professional (which I prefer for my clothes).
 |
| A (line it up with pants right side out) |
 |
| B (stitch it down continuing around the pant leg--- pinning it is completely optional) |
 |
| C (see how the excess overlaps over the folded part. Keep stitching until you've gone past the underneath fold. Trim off any excess length) |
 |
| D: Turn fabric down, roll under 2 times, iron, and top stitch (as seen below). You can also continue with the original tutorial above at step #7. |

 |
| A pair of my daughter's and son's pants. |
I know this is just one small change in the tutorial but doing it this way is much faster for me and makes it that much more likely that I'll actually lengthen my kids pants before they grow out of them. I can actually do 2 pairs (with this method) in less time than it takes me to do 1 pair following the original steps.

I like it! I may try that on some pants cut to capris. Hmm.
ReplyDeleteYou're going to add it to the bottom as a cute trim or are you going to make them long again?
DeleteI feel your pain on short pants! It drives me crazy that they are rarely long enough, and then when you sit down--totally understand. Thanks for the tutorial!
ReplyDeleteYou are welcome! So frustrating... For years I bought way too big pants because most jeans do not come in long length until size 8 and up. Growing up I have no idea what size I wore but I wore size 14 avg. quite often (I was probably a 4 or 6 tall) to get them longer.
Delete