Wednesday, December 4, 2013

Leftover Turkey?


My all time favorite leftover turkey recipe is this excellent Curried Turkey Salad

Curry, Craisins, and Turkey.... so tasty.  I'm going to chop up some turkey and freeze it until I get some craisins (plus I've been eating a lot of turkey lately).  For the chutney (which is hard to come by in the west) I've used a generous measurement of whole cranberry sauce, mincemeat, or apricot jam.  I'll likely use some tart chokecherry jam that I made this year.
Here's also a link on making your own curry.

I recently made some  

Black Bean 'n' Pumpkin Chili 

It is some excellent chili but it doesn't taste super pumpkin-y but the pumpkin gives it a nice thick and smooth texture.  The second time I made it I used a large double can of pumpkin and I left out 1/2  of the chili and cumin (because it was a little spicy for the kids).  Made it for about 10 people (8 adults 2 kids) and they certainly polished it off.  Served with shredded cheddar cheese and tortilla chips.

 What are your favorite ways to eat leftover turkey? (besides with leftover stuffing and cranberry sauce...mmm).  Please share your recipes in the comments below.

Monday, October 28, 2013

Tips for Baking the Perfect Idaho Potato

I did most of my growing up in SE Idaho.  I know this post is a little late in the season... all the potato harvesting is done by now but this fall weather is perfect time for baking potatoes (especially to go with a meatloaf...).  I am kind of a potato nazi;  I can't stand a poorly baked potato, and I always eat my potato skins!  That's where all the fiber and protein is.

Tips for Baking the Perfect Potato: (much of this info I gleaned from a random un-cited handout but some of it I know is from the Idaho Potato Commission)
Never bake Idaho potatoes in aluminum foil.  Foil seals in the moisture and steams the potato, making the texture pasty instead of dry and fluffy.  Aluminum foil can be applied after baking, however, to hold the serving temperature longer. 
Scrub the potatoes well, and dry them thoroughly.  Prick with a fork in a few well placed spots (or try rubbing the potato with oil before baking, instead of pricking the skins).  This allows the steam to escape.  Medium sized potatoes should be baked in a 425 degree oven for 55 to 65 minutes or baked in a 350 degree oven for one hour and 25 to 35 minutes.  Higher heat gives darker, crisper, skins with fluffier interiors.  Potatoes are done when a fork slips easily in and out.
 Becoming a connoisseur: You can tell an Idaho potato connoisseur because he or she will never open a baked potato with a knife.  Instead, the connoisseur will poke a zigzag pattern into the top of the potato with a fork, then will press the ends of the potato together to open or "blossom" the potato.  The connoisseur recognizes that the blade of the knife flattens the surface and alters the fluffy texture of the properly prepared Idaho potato.

Celebrate Spud harvest by making delicious perfectly baked potatoes!

PS-If you ever get the chance visit Shelley, ID about the 3rd Saturday in September for the Annual Spud Day!  They serve free baked potatoes with a milk box, and you can watch people do a tug of war over a giant pit of mashed potatoes (plus all sorts of entertainment, a parade, contests, good food and vendors).

Sunday, October 20, 2013

Excellent Pumpkin Cake with Light and Creamy Frosting

I made this cake and took it to church for a potluck dinner. I got rave reviews. The recipe was easy so I wanted to be sure to share it.


I started with a Pumpkin Cake I found on Allrecipes  I altered it a little, so here's my version.

Pumpkin Cake III

2 cups white sugar
1/2 cup vegetable oil
3/4 cup applesauce
1 tsp vanilla extract
2 cups canned pumpkin (or a 15oz. can) or cooked & pureed pie pumpkin
4 eggs
1 1/2 cups all-purpose flour
1/2 cup white whole wheat flour
3 tsp baking powder
2 tsp baking soda
1/4 tsp salt
2 tsp ground cinnamon
1/2 tsp ground cloves
1/3 tsp ground ginger 

Directions (from Allrecipes)

  1. Preheat oven to 350 degrees F (175 degrees C). Grease and flour a 12x18 inch pan. Sift together the flour, baking powder, baking soda, salt, cinnamon, cloves, and ginger. Set aside.
  2. In a large bowl combine sugar, oil, and applesauce. Blend in vanilla and pumpkin, then beat in eggs one at a time. Gradually beat in flour mixture. Spread batter into prepared 12x18 inch pan.
  3. Bake in the preheated oven for 30 minutes, or until a toothpick inserted into the center of the cake comes out clean. Allow to cool.

FROSTING 

Found in a Facebook share from this gal: https://www.facebook.com/melody.mclaughlin1 ---she has lots of good looking recipes on her wall...) 
---------------------------------------------------------------------------------------------------------------
EASY HOMEMADE WHIPPED CREAM FROSTING

This is SOO delicious. It WONT melt at room temperature like regular whipped cream!
It's VERY stable. Its wonderful used for frosting a cake or even dipping fruit in it! Not TOO sweet.
Very versatile!

**This recipe makes 5 cups**

1 (8 ounce) package reduced-fat cream cheese, softened [I used neufchatel)
1/2 cup white sugar [yes regular granulated sugar]
1 teaspoon vanilla extract
1/2 teaspoon almond extract [I used orange extract because I didn't have almond on hand]
2 cups of heavy cream

Directions:

Combine the cream cheese, sugar, vanilla extract and almond extract in a large mixing bowl or the bowl of your mixer.

Once all in the bowl, mix on medium speed until smooth.

While the mixture is still whipping, slowly pour in the heavy cream.

Stop and scrape the bottom of the bowl a few times while you continue whipping until the cream can hold a stiff peak.
---------------------------------------------------------------------------------------------------

I slathered this over the sheet cake and then using a star frosting tip did a zigzag border around the outside edge.  Simple yet so tasty.  I'm not sure if this frosting is sturdy enough to hold up a multi-layer cake, but if you try it out let me know.

ENJOY!

Monday, October 7, 2013

Pregnancy Woes: Veins Part 2

I wrote about this a couple months ago.

Pregnancy Woes: Veins

I've been trying my best to deal with my vein issues.

I'm all about prevention and I wish I knew more about veins before my pregnancy.  If varicose and spider veins run in your family I would be prepared to deal with them during pregnancy.  I would take supplements for it before you see anything just to improve your vein elasticity and health.  If you see any signs of vein damage get some compression on them ASAP (if I had ace bandages I would have wrapped the affected area while I waited for my stockings in the mail).

Risk Factors For Varicose Veins [http://www.nashvilleveincenter.com/what-causes-varicose-veins/]

  • Sex – Varicose veins affect more women than men.
  • Hereditary – It is a hereditary condition.
  • Obesity – Obese people are at a higher chance of developing varicose veins.
  • Pregnancy – Pregnant women are more likely to develop varicose veins. This is probably because of the higher volume of blood in the body that burdens the circulatory system. In these women, the varicose veins may disappear after delivery. [this was my experience with my last pregnancy I only slightly found one bulge near the end of my pregnancy and it faded. Hopefully my new ones will fade too.]
  • Age – With increasing age, the walls of the veins weaken and lose elasticity.
  • Certain jobs/careers – Long periods of sitting or standing at a job can raise the likelihood of developing varicose veins.

A leg exhibiting spider veins
http://ohiovein.com/spider.html
varicose-veins3
http://www.nashvilleveincenter.com/what-causes-varicose-veins/


So when I first wrote my other post I had a few bulges in my thigh and behind my knee of my right leg.  They are varicose veins.  They look like twisted and knotted veins under the skin.  Mine look kind of like the image with the greenish background although less defined and on my inner thigh. I don't want to share pictures of my own legs at this point...

Shortly after I started taking my supplements I started getting spider veins on my calf (kind of like the image above right but mine look like 3 bruisy splotches) .  They are not just itchy but when they get bad at the end of the day they are a bit painful.

I ordered some compression knee high socks... they definitely help.  I think wearing the compression helps prevent further damage and helps them to heal.  If I could stand the heat of wearing full pantyhose in August (or if I had AC) I would have worn them all the time.

I bought these knee highs at discountsurgical.com (best prices I found on the web) they are the value brand and I think they work just fine and I really feel the difference when I'm on my feet all day. I ordered medium 15-20mmHg in nude and the color was a little pale/cool... depending on what I wear with them it's less noticeable, but wearing a knee high sock I'm not showing much leg.  They are very snug and stiff so I found wearing them in flat shoes gives me a crease at the ankle... looks old and frumpy.  So if I wear them with a skirt or dress I wear a 1 1/2 - 2 inch heel and I don't have the issue.

I also ordered some full maternity pantyhose so I can address my thigh issues too.  I also ordered them in nude but the color looks a lot better (warmer color) than the knee highs.   Now because of my height (5'8") I just barely fell in the Lg category on the size chart (use pre-pregnancy weight).  I almost considered ordering the Med. because I'm vain and I worried that the they would not squeeze my scrawny calves very well... I am GLAD I went with the larger size because I am tall.  When I first wore them around 30 weeks or so, they didn't feel tall enough in the torso and they felt like they were actually pulling my pregnant belly down... This also added to that breathless feeling I was getting at that time in my pregnancy.  Luckily after my baby dropped (his head is right at my pelvic bone) they became much more comfortable and since the weather began cooling off, I wear them much more often.

Before the weather cooled I also ordered these: I figured they would let my feet breath and I could wear them with just about anything. The only issue is that I have pretty full thighs and some saddle baggage so I get a little bulge above the top band... so I don't wear them with yoga pants or slim fitting clothing but I wear them under jeans all the time.  I would prefer these in a medium compression but they only come in firm compression.  When I wear them I have occasionally noticed some edema (swelling) in my feet by the end of the day.  I like having these as an option because they are cooler than having my feet and belly covered in synthetic fabric... they are also kind of cottony but still slightly sheer.----UPDATE... one day I wore these and my feet swelled up pretty bad... with pregnancy edema is also an issue.  Since then I only wear them with nice snug socks.

I also ordered one pair of white knee-high athletic socks.  I actually got a different pair than I ordered.  They sent me some Mojo (a name brand) socks.  They have their name in black at the top and on the soles... I love these socks and plan to wear them all the time even after pregnancy (they feel so good on my calves and feet... giving them a constant hug).  They are not sweaty like nylons and just very stretchy and easier to put on.  I always am sure to keep my calf spider veins compressed or else they get worse.  I've been keeping my calves compressed all day and they are showing a lot of improvement.  I wear these socks if I'm planning on taking it easy during the day and I'm not on my feet too much (because they don't cover my thigh veins).

I hope that my supplements are improving my vein health but now that I already have these ugly veins and I have the extra pressure on my veins because of pregnancy I feel that the compression is necessary to help my veins heal properly.  My spider veins are actually getting much better... which is really saying something since I'm even further along in my pregnancy.  The itchiness is also decreasing... I think it's that itch you feel when something is healing.

Tuesday, October 1, 2013

Controlling Eczema: Bleach Baths...


Okay, so you may be very skeptical of this post.  I was when I stumbled upon an article about Eczema and the mother mentioning this.

 http://health.howstuffworks.com/skin-care/beauty/skin-treatments/bleach-cure-eczema.htm 

I thought... hmmm that's interesting.  I was becoming frustrated with my 2-1/2 y.o.son's eczema early this spring and was getting frustrated because I knew that he was getting a lot of secondary infections from the inflamed skin, so just moisturizing as his pediatricians constantly suggested was not cutting it.

My husband often suffers from athletes foot, I don't know what it is but he was getting it this spring (most likely from an old pair of boots that he wears on outings--that increase in frequency in the spring). He uses the same bathtub that the kids bathe in.  I was noticing that DIY-son's common eczema patch under his knee (usually flares up when the weather warms up--from sweat/or irritation or just wearing shorts) was looking patchy like a fungal infection. See image below.  His has never gotten this bad but I could see raised borders and circular patches.
source: http://www.pennmedicine.org/encyclopedia/em_PrintArticle.aspx?gcid=000877
 So I started putting Clotrimazole Cream (name brand Lotrimin-original formula) on his itchy patches... Oh they really itch him (especially when he sweats or goes more than a couple days between baths).  But,  I worried that every time I bathed him he was getting re-infected and often scrubbed the tub before bathing him. And because we have a rubber mat in this bathtub at our new home (no texture on the bottom of the tub) I was trying my best to scrub it too and to be sure everyone draped it to dry off between use.  It was becoming such a pain and I was getting so paranoid that this vicious cycle would never end.


I started searching on the web for ways to treat/prevent eczema and preventing/treating secondary infections.  I stumbled on that first article then I looked for more articles on bleach treatments and found this article that describes studies that were done.

http://www.webmd.com/skin-problems-and-treatments/eczema/news/20090427/bleach-baths-may-help-kids-with-ezcema

I thought I would give it a try, so I measured about 1/4 cup of bleach into his baths about half full and I felt so much better about the rubber mat and all the fungus it could be harboring... My daughter thought it was fun because it seemed like they were at the swimming pool.  I bathe him first and then I add more hot water (to warm it up more and she likes a deeper bath) before my daughter gets in.  Then her bath is much more diluted.

Within a couple days I was seeing results and his flare ups actually went away for much of the summer.

Our Regular Routine:
I bathe my son about every other day (about 3-4 times a week) If/when my son would get a patch under his leg or around his wrist I found it helpful to scrub the patches with a washcloth and mild soap while in his bleach bath to help remove and break up the rough dry and flaky skin.  Then following his bath I apply the anti-fungal cream first (if the flare-up has lasted a while and I suspected a secondary infection---which are becoming much less often) and then I use Aveeno extra dry skin lotion or an eczema cream (see my earlier recommendations).  I apply the lotion especially to his limbs and a little on his face (using a good water-barrier type lotion after each bath really helps strengthen his sensitive/delicate skin and prevent flare-ups).

The best part is, I generally only feel the need to scrub the tub about once a week!

Seriously adding a little bleach to my son's baths have really made a difference in our lives.  I wish I had started it when he was younger... (I'm not sure how early you may want to do this... maybe after 8 months or so... or when they start bathing in the community bath tub starting with very little bleach).

If his skin is looking really good I often don't bother with a bleach bath and maybe only do it once a week.  Eventually I'm sure he'll grow out of his eczema like his sister did (although hers was more mild).

For now, this is really making a difference and if your child is suffering from eczema it's worth a try (not like we never take our children to a chlorinated swimming pool---- which some people notice clear up eczema and acne conditions too).

Please share this with mothers that have eczema tortured children... I wish someone had shared it with me long ago.

Let me know if it helps!

DIY-Mom

Wednesday, August 7, 2013

Pregnancy Woes: Veins

Did you know that pregnant women have a whole lot more blood.  This is what my hand looks like when I'm pregnant.  This pregnancy (#3) has been giving me problems with veins in my lower body... I guess I'm used to seeing vein-y hands.  They look so much like my mom's.  But I don't find it at all pretty on my calves and thighs.  I generally don't experience pain with them but I don't like the way they look.


Thursday, August 1, 2013

Canned Apple Pie Filling

I have scoured the internet and tried several different methods.  Between me and my neighbor, we find this to be the best recipe and method.  TRY MY IMPROVED RECIPE

There are bubbles in the top because I shook them up for the photo (not because it's runny).

Supplies:

7 quart jars/batch
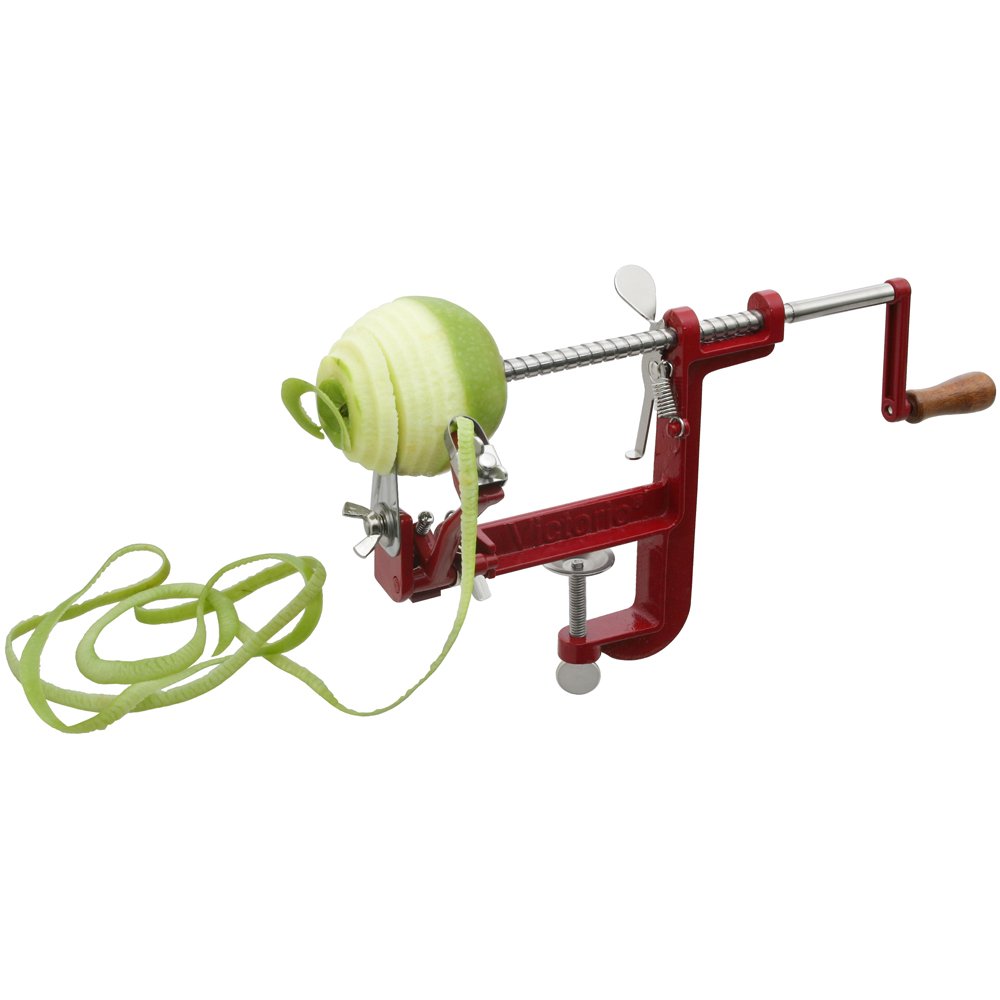
a crank apple peeler/corer
canning supplies (pot, jar lifter, lids, rings, funnel)
lemon juice
water
apples enough to fill 7quart jars 4-7 apples/jar depending on size

Process:

http://www.amazon.com/Victorio-VKP1011-Apple-Potato-Peeler/dp/B001DLP4EM/ref=sr_1_5?ie=UTF8&qid=1381779354&sr=8-5&keywords=apple+slicer+corer+peeler
Peel and core apples on a peeler/corer/slicer as seen above.  If you'd rather you can do any other preferred method but this is much faster.

Using a very large bowl pour lemon juice and water (maybe a half cup of lemon juice/quart of water). about 1/3 full (you can add more water/lemon as needed).
As each apple comes off the end of the corer, cut it in half and remove any pieces with skin, flaws, etc.  Then you will have smile shaped slices.  Save the skins in one container (puree cook them down sweeten and make them into apple butter...mmm).  Place the slices in the lemon water to wait until you process to prevent browning.

If you have someone helping (which I recommend because this is a pretty time consuming project)  Have the other person prepare the filling sauce:

Filling Recipe:

5 cups sugar
1 cup thickener (I prefer flour for a hearty apple pie--some like cornstarch for a clear jell--looks store-bought to me)
2 tsp. cinnamon
1/2 tsp. nutmeg
2 tsp. salt
7 cups water

Mix the dry ingredients in a bowl making sure to break up any flour or starch lumps.  Measure cool water in a large sauce pot, whisk the dry ingredients into the water until smooth.  Place on stove top and bring to a boil (watch closely and stir)  I do this on high so I don't have to stand around all day waiting for it to boil.  You don't want to leave it to boil or it can boil over and make a big mess of the stove (I know).

Fill the Jars:

 When you've got a large bowl of apples filled take a minute and prepare your jars by rinsing in very hot water or have them waiting in a hot dishwasher and fill your canner maybe 1/3 full with hot tap water.  Prep your lids by letting them sit in hot simmering or near simmering water. 

Using a funnel fill each warm jar with 1 1/3 cup of hot filling (I use a 2/3 cup twice).  Then pack apples into the jar and push down into the filling until you get the jar filled up to just beneath the neck of the jar (1 inch head space).  It is just right when you push the apples down and the filling rises up to that level flush with the apples.  It's okay if the apples rise up a little higher after you pull your hand away. 

This is the method for filling jars I came up with because you have a consistent amount of filling and apples in each jar and very few bubbles in the jar. You will have some leftover apple filling/sauce.  You will have more or less depending on how long your pot sat their warming/evaporating while waiting for the apples.

Canning:

Wipe the rims of each jar with a clean damp cloth, top with a lid, and secure with a ring nice and tight.  Lower the jars into your canner filled with quite hot water (not boiling or even simmering).  Add cool water if you warmed it too hot.  Your filling is not very hot because of the cold raw apples, so be sure the water isn't too hot or you might break some jars.  Make sure their is 1-2 inches of water above the tops of the jars.  Bring the water to a boil and time it (process it) for 25 min. at sea level.

Be sure to adjust processing according to your altitude. I do mine for 30 min.

Altitude Adjustments for Boiling Water Bath Canner
Altitude in Feet Increase processing time
1001-3000 5 minutes
3001-6000 10 minutes
6001-8000 15 minutes
8001-10,000 20 minutes

 (chart from http://www.simplycanning.com/canning-apple-pie-filling.html -- I adapted the recipe and made up my own method after trying out the recipe/process from this site).

Carefully remove your jars with a lifter from the hot water and place on a towel to cool and seal.  Don't mess with them until completely cool or you could hamper the sealing process.

When ready to bake a pie follow the directions for your crust recipe for a filled pie.  Each jar will fill an 8" covered pie.  I always make sure to cover my edges with foil to prevent them from burning.  Because I'm lazy I often use 1-1/2 to 2 jars of filling in a 9x13" pan  to make an apple crisp (plus it's got whole grain oats instead of pastry).  We serve it warm with vanilla ice-cream.

Enjoy!

Monday, July 8, 2013

Transitioning from Crib to Bed... thumps in the night.

This do it yourself tip was one I developed out of necessity.  I wish I had figured it out when we put my oldest into a twin bed.

First of all, I advise keeping your baby in a crib as Long as Possible.  It is nice to have them contained and you don't have to worry about them waking and wandering the house.  My 2.5 yr-old has been able to climb out of his crib for a while now.  I think his older sister showed him some tips to climb out.  She's very helpful like that. At first I just told him very firmly not to climb out of his bed when I put him down.  He's pretty obedient when he knows I'm serious.  It worked pretty well for a month or two although he got out a few times when his sister got to him first. He didn't seem to hurt himself (luckily he's pretty cautious about getting hurt).  But it was definitely time to make the transition.

my little guy posing in his big boy bed

Monday, June 3, 2013

Tasty Whole-wheat Snickerdoodles

Okay cookies really aren't too healthy, but you gotta indulge sometimes.  I love it when I find wholesome wholegrain goody recipes.

Recipe found here:


This is a really quick blog entry.  I just had to share.

I made these twice.  The first batch disappeared way too fast.  I made a double batch the second time (which it's really easy to have allrecipes calculate the measurements).

MY EXPERIENCE with this recipe.
I used Wheat Montana White Whole Wheat flour.  I froze the dough for 5-15min before rolling it in the cinnamon/sugar.  I used more cinnamon than sugar and got a nice dark crackled finish.

These cookies are heavenly straight out of the oven but I think they get even better after cooling and stored in an airtight container.  So soft and chewy and they kept well for 4 whole days (I'm sure they'd go longer just haven't had them around long enough).


King Arthur makes a white whole wheat flour... I've used it before very similar:

Monday, May 20, 2013

My Past Birth Stories

This is a long post.  Maybe you are not interested in reading about it.  Giving birth is amazing.  I have 2 very different stories.  I wrote both stories shortly after I had each child.

Monday, May 13, 2013

Becoming a Mom Again and Choosing a Care-Provider


Both of my kids at about 1 wk old.

So we let out our little secret yesterday.  We're having another baby due mid-November.  I have a few followers on here that I know don't use Facebook so I wanted to share here too. I've been pretty distracted figuring things out over the past few months.  It's hard to write posts when you've got baby on the brain (and you don't want to share yet).

Things Get Complicated 

Friday, May 10, 2013

Homemade Granola

I made my first batch of homemade granola last week and I'm hooked.  I got the recipe from this site:
http://www.greenplaterule.com/recipes/homemade-healthy-granola/


I bought coconut oil from Bountiful Baskets and picked up some chia seeds, I've never actually had them before but figured this was a good excuse to add them to my pantry.

I made it a little too toasty last week which made the raisins too hard.  So here is my new version.

Homemade Granola

Friday, May 3, 2013

Make your own Instant Oatmeal

My husband is going camping with the scouts tonight, I decided to look up my instant oatmeal recipe so he can take it with him for breakfast in the morning.  We love the just add water camping food.  So easy and hassle free.

I posted this a few years ago in a Facebook note. and decided to resurrect it here on my blog.
Make a much cheaper version of this convenience food.


I did not come up with this recipe I found it on some guys blog. He credits someone else...
http://www.grouprecipes.com/22495/make-your-own-damn-instant-oatmeal-packets.html (sorry about the profanity)

Kelty loves instant oatmeal. I use whole milk instead of water. I stir a little less than 2/3 cup milk in with the oatmeal, microwave for 1 minute and then add 1 ice cube to cool it off quickly. I have only made the brown sugar version (w/out cinnamon). Kelty loves it. She always eats every last bite of her oatmeal (unlike most other meals). I tried making it before I found this recipe and I could never get the proportions (or the consistency) right.

Tuesday, April 16, 2013

Eating Healthier

A few months ago I did a presentation for the ladies in my church group.  We had a night dedicated to Physical Wellness.  We had some very good presentations and discussions.  I found my notes from my presentation on Eating Healthier.  I read through them and expounded.  I needed to go over these too because I need to refocus on our diet.
The new food guide focuses on proportions. notice that veggies take up the most space.


Make Meals Healthier:  Change your mindset: “I want that, but I can't have it" to "I can have that, but I don't want it." The more you eat healthy foods, junk food loses its appeal (Hungry for Change).

Thursday, March 21, 2013

Cheesy Cauliflower Soup Recipe Review

This soup is right up my alley.  Tasty, simple ingredients, quite healthy, and crowd pleasing.  I'm adding it to my meal repertoire.


I was looking for something for dinner tonight and I have a whole cauliflower from my Bountiful Basket that needed to be eaten.  I searched cauliflower soup and this was the first recipe that I had all of the ingredients and it just sounded tasty and simple.  It was.  I was very excited because it also called for carrots and celery (which I also have an abundance of).  The best part was that everyone at it up and some asked for more.
      
I made it without the hot sauce (because I only have smoky flavored Tabasco) plus DIY-dad and I usually add the spice to our own servings.
Served with tuna salad and a choice of bread or crackers.


Unrelated BLOG NEWS: There is only one week left to use my promotional code  on Halftee.com. 
 

Monday, March 11, 2013

Egg-citing Easter Egg Decorating

Want to make some awesome Easter eggs this year?  Here are 4 different ways to make some awesome eggs.

I'm doing a few of these projects this week.
Patchwork Fabric Eggs:  Blow out the eggs and these eggs will last forever.  My mom has some that are decades old.  The glue and fabric make them really strong.  I did these ones below. We did some using Elmer's glue (thinned) and an off-brand Tacky-Glue.  Avoid the tacky glue because the fabric sticks to your hands too much... if you add lots of water it might do okay and they did have a more transparent affect.  I used both simple cotton fabric and flannel (see the ladybug egg).  It gives a little different texture (note: the flannel absorbs more glue).


Next year I think I'll try this technique with colored tissue papers.

See my post on Patchwork eggs with tips on making different patterns

Silk Tie-Dyed Eggs : I've done this for a few years. It's awesome.

Wednesday, March 6, 2013

Kick that Head Cold to the Curb/Bonus: DIY facial

This Blog entry is a little different.  A friend of mine just started an awesome blog called Swag on Momma (swagonmomma.blogspot.com).
  She asked me if I could contribute for her.  I was happy to help but I also wanted to share it with my readers so here's the link.

 Swag on Momma: Kick that cold to the curb.


 She also puts a lot of information about her contributors.  When I started my blog I haven't put a whole lot of personal info out there.  Here's my introduction post:

Swag on Momma: Meet Becca


Thursday, February 28, 2013

Halftees: Solving Wardrobe Issues (promo code!)

I hate to layer.  I don't like all the extra bunching... and tugging on layers keeping them from riding up.  Over the years I've avoided wearing several of my favorite clothing pieces because they are too revealing to be worn alone, but I don't like messing up the look of the outfit with all the bunching (usually at the waist).  Do you avoid buying beautiful, flattering, stylish clothes because they are just a little too revealing... even when you find them at a great price?  I have.

Halftees are a great way to save money by expanding your current wardrobe.You won't feel like you need to go out and buy something new, because you're frustrated about all your cute clothes you can't or don't wear.

Keep reading for an exclusive Halftee promo code for DIY-MOM readers at the end of the post!

Saturday, February 16, 2013

Free Online Workouts

 I've been collecting a series of online workouts. I prefer ones that I can do without equipment in my underwear (no extra workout clothes to wash)... I suppose when my son gets older I'll have to change my habits.


BASIC WORKOUTS 
I found this years ago. I love Joel Harper's workouts... They're from Oprah/Dr. OZ

http://www.oprah.com/health/The-Maximize-Your-Time-Workout-A-Dr-Oz-YOU-Q-ToolFre

http://www.oprah.com/oprahshow/The-Excuse-Busting-Workout-Video 

http://www.oprah.com/health/Take-Charge-Workout-by-Joel-Harper-and-Dr-Oz-Video

They may seem challenging at first (especially if you're out of shape) but get easier each time you do it.  I always feel so good after doing these workouts.
If you are looking to lose some pounds I would suggest doing more throughout the week. Either walking or doing some sort of cardio.  


 PREGO AND FIT: If you're expecting I feel it is very important to exercise.  If you don't pregnancy can be very miserable.  I consider childbirth like a marathon.  The better you prepare for it the easier it will be and easier to recover from.  Doctor Cathy on You Tube has some excellent workouts  that saved me during my pregnancies.  (I also highly recommend a natural childbirth or Lamaze class).

WARM UP  This warm up can be done throughout pregnancy and helps to stretch and relieve all of the tension and sciatic pains that comes with pregnancy.  Around 8 months some days I was unable to walk without doing this simple 6 minute warm up.  If I was really stiff and immobile I would do it 2 or 3 times (it's so short you can)  and I'd feel so much better by the end.

CARDIO PRE & POST NATAL This one is a great workout that helps your abs support that huge belly.  It was also helpful when I needed to firm up after giving birth.  I like this workout because it requires no equipment.  She has tons of other workouts that you may need an exercise ball, weights, or help from a chair etc.


SERIOUS TONING/SHAPING WORKOUTS: For those who're looking for a challenge.  These workouts require good sneakers and comfortable clothes and a little more space than the others.

Tracy Anderson is so lean and strong.  Her workouts are quite challenging but I believe the pay-off will be worthwhile.  I need to get working on her workouts... they are pretty hard for me and I'm in pretty good shape at this point.


Butt and Thighs


Her 45 min. Thanksgiving Cardio series (this requires dance/coordination skills which is probably what makes it the most challenging for me.  If I buckled down and did it 3 times consecutively I could probably get it down.)
PART 1    PART 2   PART 3  If you make a playlist on youtube you can get it to autoplay these in a row.

You will feel the burn with this one... just jumping around, trying to keep up, you're guaranteed to lose some pounds.

If you know of some more awesome free online workouts that you can do easily at home.  Please Share.  I plan to add on to this post.

Saturday, February 2, 2013

What's a Flexitarian?

image source
I feel like I am already becoming a Flexitarian and I just found out what one is: I stumbled on a blog written by a woman explaining how she eventually became a vegan. I don't feel that veganism is necessary, but I want to consume much less meat.  I've watched a lot of documentaries on the food industry, the poor treatment of animals, and the unsustainable nature of our nation's animal product over-indulgence.  I've been eating less meat and I really would like to stop purchasing meat from large meat producers.  Kellie (from the blog) read this book by Michael Pollen, In Defense of Food  (he also is behind the film Food, Inc which is in my netflix instant cue :o)

Monday, January 21, 2013

When your child swallows a foreign object. Part 2

So, I've always been paranoid about my kids putting small objects in their mouths.  Pennies and dimes have always been picked up religiously.  Quarters? No, they're so big!  Not that I let them suck on them, I just didn't worry about them.  Well apparently not for my little guy's big mouth... but they're still too big to go through his pyloric valve (he's 23 mo. old).
See: When your child swallows a foreign object. (part 1)


The pyloric valve is between the stomach and the small intestine.  It regulates flow through and I think it prevents back flow.  Every 3-6 hours the stomach empties itself into the small intestine. Caleb had that quarter in there for 3 days.  So 3-5 times a day for 3 days his stomach has tried to dump that quarter out, but it wouldn't go.  We went in for another x-ray this afternoon and it hasn't moved (I pretty much knew it because that's what my metal detector keeps telling me). The doctor and the specialist figure we better get it out.  I suppose it could block the valve and prevent his stomach from emptying.  This could trigger other digestion issues (I can imagine acid reflux and a decrease in appetite at the least).

We're still waiting to get a call back from the specialist's office to make an appointment.  Then we get to drive to the big city 2 1/2 to 3 hours away.  The appointment will be scheduled first thing in the morning since he needs to fast several hours beforehand.  Talked to the hubby and we'll probably make a day of it.  This is sure one expensive quarter.

If your child swallows a coin... And they aren't vomiting, they're able to swallow (and are eating fine), they're not wheezing (means it's stuck in the airway), they're having regular bowel movements and they're not in pain;  I would use a metal detector to confirm there is something in there, to make sure it's made it to the stomach (below the rib-cage), and note the general location.  I wouldn't worry too much for a few days.  Check their stools religiously.  If you haven't found it in 3 days, then use a metal detector to confirm that it still in there (you may have missed it) and to see if it's moved down closer to the pelvis.  If it's noticeably lower I would just keep checking the stool (preferably w/ a metal detector). If the kid told you it was a quarter and you haven't seen it in 3 days and the metal detector still shows it near the middle of the abdomen, then I'd take them in for medical consultation and or x-rays.  Otherwise just keep looking for it until it passes. [If you don't feel comfortable with any of these suggestions feel free to call your doctor or the hospital if it's on the weekend].

My little sister once swallowed a necklace charm of mine.  I got the job of changing stinky diapers and examining the contents for maybe a week.  I got it back.  I washed it and sanitized it.  It was polished nice and bright from her digestive enzymes.  I still wear it on occasion. It had sentimental value beforehand and has more now.

I'll let you know how it goes.  I guess they're still a chance it could pass before we go for the procedure but who knows.  They'll take an x-ray before they do it.

We've scheduled the procedure for 8 am on Thursday.  We've got to check in at 7am... leave home at 4am.  I thought about getting a hotel, but I think we'll get better sleep in our own beds.  Then the kids can sleep in the car on the way there.

---When I mentioned the metal detector to the gal at the specialist's office she couldn't stop giggling. She thought it was hilarious yet clever.  Reminds me of when DIY Dad (just a kid I sat by in 9th-grade computer class) told me he got it for his birthday.  I guess I teased him about it. I thought it was a weird thing to ask for for your birthday. Never thought I'd be using it on our kids one day.

Saturday, January 19, 2013

When your child swallows a foreign object.

Caleb swallowed a quarter yesterday.  At first I did not believe him.  I've never been worried about quarters.  We have them in the cup holder in our car.  I occasionally let Caleb look at the pictures on them. I always told him not to put them in his mouth.  Kids put everything in their mouths! You can't trust them. 

Wednesday, January 16, 2013

Make your Own Laundry Soap

GOT LAUNDRY SOAP?

I know this is all over the internet.  I avoided doing it myself because I couldn't find a definitive 1 right way to do it.  I moved around a lot in the last couple years and I figured it's just one more thing I don't have time for.  The fact is, I do.  It is not time consuming.  It's like making a batch of cookies once every couple months.
READ TO THE END FOR MY LATEST UPDATE!!

Wednesday, January 9, 2013

Are you Hungry for Change?

So, I know it's that time of year when we evaluate our life and try to take better care of ourselves.

I recently watched a documentary called "Hungry For Change"  (it's available on netflix).

  Do you ever feel like you can eat all day long and still be starving?  Processed foods are high in calories and low in nutrients.  They leave our bodies overfed and yet starving for what it really needs.
Related Posts Plugin for WordPress, Blogger...