Thursday, September 8, 2016

Homemade Granola/Cereal Bars

  So I needed a treat for my toddler's nursery group at church.  I wanted to make something tasty yet semi-healthy and didn't want to go to the store.  I found a super easy crispy treat recipe using corn syrup (no marshmallows on hand), peanut butter, and sugar.  I had all the ingredients and had some nasty WowButter (soy butter) that needed using up and it would be safe for anyone with nut allergies at church.
  This has been life changing... so much so I actually hopped online to make a blog post :o)... so I can share it more easily with friends.
This is a half batch in a 7x11" pan.  The full batch makes much more squares.
Now I'm making these regularly and I'm playing around with different ingredients.  I just follow the same basic formula and it's so easy I don't even have to look up the recipe (which I'm terrible with numbers).

  • 1 cup corn syrup (or honey works too. Going to try pure maple syrup next time and cook a little longer)
  • 1 cup sugar (or granulated/dry sweetener I used powdered honey last time)
  • 1 cup peanut butter (WowButter works and I bet almond or Nutella or anything similar consistency)
  • 6 cups cereal (all one kind or a combo. I've used all of these in different batches: quick oats, rice crispies, cheerios, wheat puffs, (these are just the boring cereals I buy (I don't buy sugary cereals for my kiddos... they are content with the boring stuff).
  • optional stir-ins: (maybe just 2 cups or less of these things... so they hold together) peanuts, sunflower seeds, craisins, raisins, mini choc. chips, or any flavor baking chips*, gummies, mini-Reese's pieces, 
Butter a 9x13 pan.  Combine corn syrup and sugar in a bigger pot (so you can stir all the cereal in later). Stir and melt the sugar in the syrup and bring to a simmer (cooking longer will make a stiffer bar, less will make them soft and gooier-but fall apart easier) .  Stir in the peanut butter.  Add cereal(s).  Stir in any add ins*.  If too gooey add a little more cereal or oats (they seem to be more absorbent) Press into baking pan.  Cool 20 min or so. Cut into squares.

I like to wrap them in plastic wrap once completely cool and hide them in the pantry with other kids snacks to put into lunches (if made without peanuts).  It is also good to free up my baking pan and to keep me from snitching on them all day.


*For melty chips I press a layer of 1/2 the cereal goo in the pan, sprinkle a layer of chips and then press the rest of the cereal on top so it sandwiches the melty, messy chips in the middle.


My kids love these.  All the kids at church loved them.  Let me know what you think.  Let me know what combinations of ingredients you try. 
 Happy Snacking!

Wednesday, January 20, 2016

Ginger Snap Overnight Oatmeal

As per request... I am making a post with my recipe for overnight oatmeal.  I randomly saw a post about it and went out to buy slow-cooking steel-cut oats just to give it a try (they were really cheap at Bulk Barn...never heard of Bulk Barn, eh?... it's a wonderful place I found in Canada).  I haven't made a post on this blog in a long while... just scroll my feed... you'll see.  I had a 3rd kid, I started a home based business, did a lot of travelling with kids in tow, and I moved to Canada... yeah I've just been a little busy.

So I happened upon this recipe probably from a Facebook post:
http://www.target.com/r/recipes/apple-cinnamon-overnight-oats-2-recipe

I cut the recipe in half because my husband doesn't get out of bed at a decent hour and rarely bothers with breakfast, and I knew 1 cup of oats would make plenty.

The first attempt I crumbled up dried apples, added a little extra water for them, added brown sugar and cinnamon.  I also left out all the nuts/seeds in the recipe since my toddler can be a little too regular when fed nuts and over fibrous meals. I turned it on at 10pm and turned it off around 6 am... overcooked a bit and kind of brown and crispy on the sides but my kids ate it with a little milk... and the dried apples where just like cooked apple pieces in an apple pie. I like to scrape and eat the brown caramelized bits from the sides of the crock... the best part.

I decided to get my outlet timer for my 2nd attempt and only cook it for 5hrs instead.  I realized I had a container of ginger I never opened and packed up to Canada when we moved so I decided to find a way to use it in the oatmeal... and my kids love ginger snaps... Then I thought... I'll just get my inspiration from a ginger snap recipe... so here goes.

GINGER SNAP OVERNIGHT OATMEAL

1 cup steel cut oats
3 cups of water (I just realized I'm going to use part milk next time)
1/4 tsp salt
1 tsp chopped ginger (can also use powdered ginger or whatever you have)
2 Tbsp Molasses
1 tsp Cinnamon
1/4 tsp cloves
1/4 cup brown sugar

Cook on Low in the slow cooker for five hours.  Serve with milk, yogurt, or straight from the crock. Feeds about 3 small kids and one adult... maybe 3 adults... easily 2 adults and 1 kid... Double if you want an equivalent of 4-6 adult servings (the recipe I found made with dbl the water and oats said 8 servings... I guess it had nuts too... but I wouldn't think it would serve 8 adults.)

This stuff is super-cheap and easier than making separate bowls of oatmeal in the microwave for my kids in the morning.  You can put pretty much anything in it you like.  I think I'm going to do apple spice and almonds on my next attempt.

Let me know if you like it and if you have any other overnight oatmeal recipes... I am definitely a novice on this.

Wednesday, April 1, 2015

Easter-time Again.

Easter is just around the corner.  I hope we're enjoying time with our family preparing for another holiday.  Just a reminder of the purpose of Easter.  My daughter asked last week, What is Easter about anyway?  I asked her what she guessed... springtime, new baby animals, and eggs (although she wasn't sure why).  I told her that we celebrate Christ's resurrection and how he rose again.  He was dead like everything seems to die in winter and just like springtime brings new life, He lives again.  It is beautiful and wonderful.

There is a new video on Mormon.org with an inspiring message:

Because He Lives


In previous years I've shared some great posts.

  For more spiritual focus:  


and for some festive fun:


As far as egg decorating this year, I just did some dying from a simple kit. I had fun dipping while layering different colors in stripes (best to start with primary colors and layer on analogous colors). I found that rubber bands are a fun way to make stripes (especially the thick broccoli rubber bands).  And we had a kit that came with tattoos which are really cool and look much better than the stickers you find in most kits.

Here are a few of my beauties:

Some of them I just left in the dye cup after all the kids were done while I cleaned up.  They came out really bold with spots where the egg floated above the surface of the dye.

Tuesday, January 6, 2015

Neglected Blog....

Dear Blog,
I felt a twinge of guilt today.  Thinking about you... sorry I am not posting wonderful posts about all the wonderful things I'm doing.  No awesome tutorials about the Christmas cookies we made or some fabulous new healthy soup I found.  I've been busy.  Frankly, I'm glad I was neglecting you.  This fall I've been trying to take better care of myself, my home and my family.

  I've been trying to get back into an exercise routine.  I've been working on repairing a diastasis recti. See this link about it too (if you've had a baby and have no clue what that is... you should). I'm surprised that my first 2 OB's never brought it up, but I may not have had it until #3 since he was my first full term birth.  I've also been seeing a chiropractor regularly to figure out why I've kept putting my back out since having this last kid and to address a long-term sway back issue that's a big reason I'm having these issues.  My posture is better than ever.

---Maybe TMI for the gents: I had a nasty bout of mastitis just before I began the weaning process with my kiddo.  That was not a fun Halloween weekend.  My advice... when the baby is distracted and not nursing well make sure you get him to nurse well at some point... and make sure both sides get well drained... feel them and work out any lumps before he's done or make sure you get them worked out asap. During or after a nice hot shower lather with lots of coconut oil and massage them out.  Don't put it off and forget about it.  Coming down with fever, chills, and all sorts of pain and tenderness....ouch it hurts to recall... so not fun. Take ibuprofen to reduce the swelling and pain.  The tips from the Kellymom site on mastitis were very helpful.  I got over it within 3 days and didn't have to go to the doctor or be put on antibiotics (I would have gone in if I didn't get it handled by Monday).

I took an awesome online class called Behavior is Language (for my teaching re-certification).  It's for helping control classroom issues and understanding why kids act out, preventing it, and dealing with it when it happens.  I'm trying to use the knowledge and tools to better understand my family and friends and interact in more positive ways.

I've been trying to keep up better with laundry and dishes and trying to get my kids to help out more, and take more responsibility for all their crap stuff.  I also read this awesome article: Raising a Moral Child the other day and highly recommend it.

I signed up for audible.com and got 2 free audio books: Proper Care and Feeding of Husbands, and Proper Care and Feeding of Marriage by Dr. Laura Schlessinger.  Then I de-activated my audible account and still have access to listen to these whenever I want.   I If I want to get more audio books I can activate it again and pay whatever monthly fee.  I also joined a "Proper Care & Feeding of Husbands Book Club" on Facebook. Both books are really helpful no matter how good your marriage is.  The first book is good if you're working on things on your own.  If your husband wants to get on board the Proper Care and Feeding of Marriage is also really good.

I'm just glad I did stuff with my family and didn't bother to grab my camera to document everything for my blog or put it off because I wasn't mentally prepared to do it properly and document it on my blog.

I don't feel too guilty after all.  It's not like this blog is making me any money.  I just hope it helps other moms out.  Sorry Blog, but I'd rather neglect you first than the other priorities in my life.

Later,
-DIY Mom

Sunday, November 2, 2014

Apple Skin Apple Butter.... sooo good.


When processing apples into Apple Pie Filling  you may find that you end up with a huge pile of apple skins.  These are not garbage... Go ahead and dispose of the cores (or dump them in the alley for the resident deer population to munch on).  While you're peeling apples keep a large crockpot nearby.  Toss the skins in the pot as you go (have it turned on low heat) and toss a cinnamon stick in there too.  If the pot is left open as you work, be sure it doesn't boil dry (add a little water) and keep it going all day.


I'm sure once you're done processing pie filling you'll have tons of energy to do apple butter.... I DON'T (we do 2-4 batches of filling and I'm beat). So I leave that baby cooking all night.  Before bed I cram it full (because the skins cook down a lot) by using a simple corer/wedger and stuffing as many apples in there as I can.  I fill a 2.5 qt and a 3.5 qt crockpot (so 6 qts.) and leave them bubbling all night.


Then in the morning we wake up to a heavenly apple smell.  I turn off the crock pots to cool while we get our morning routine out of the way.  A couple hours later I get going on it.


Apple Skin Apple Butter

20 Cups apple skins chunks and wedges slow cooked ~18hrs
1 1/2 cups Honey
1 1/2 tsp salt (w/out iodine)
 
I scoop the apple mush (removing cinnamon sticks!) into my blender until it's filled to the 5 cup line.  Then I blend until smooth and pour into my large pasta pot.  Repeat until all of the apples are pureed.  Adjust your recipe according to the amount of apple mush you measured (ex: 3/4 cup Honey for 10 cups of mush). Measure before blending since it adds air and makes it seem like more volume.  Heat until simmering and add honey and salt.

I can mine in pints or 1/2 pints, processing 15 min + my 10 min extra for altitude (don't forget to adjust for altitude).  I've been using a Victorio Steam canner (which is awesome) but a water bath method also works.

Feel free to adjust the recipe!  If you only have sugar you can use sugar. I am trying to consume less sweets so this recipe is not super sweet... you could double the amount of sweetener in the recipe (if you want it sugary like jam).  I have also added pectin before to make it thicker just following the jam directions (it is expensive so I usually leave it out since I make so much).

I use apple butter as a spread on toast or English muffins (I smear a little normal butter on and then the apple butter (like I do with jam).  We eat a lot of oatmeal (microwave 1/3 cup oats with 1/2 cup whole milk for 1 min).  One of my kids favorite stir ins is a big scoop of apple butter (I also like to add some flax seeds and a spoon of plain yogurt to mine.)

Peanut Butter Apple Fluff: To make sandwiches I make a goober mix (half creamy peanut butter half apple butter) and spread it generously between two slices of bread.  The kids call it Peanut Butter Apple Fluff.  You can use crunchy peanut butter (but the moisture from the apple butter can make the chunks soft). So I only use crunchy on sandwiches that will be eaten right away.  Peanut butter Apple Fluff is like frosting.... it is also good to sandwich between graham crackers before putting them in an airtight container in the fridge... You get soft and cakey graham bars after a few hours... such a yummy treat.  I think I will use it to frost a cake sometime in the near future... when the baby is okay-ed to eat peanuts.

Let me know if you try this... or if you made any excellent alterations.  Share your favorite ways to use apple butter.  I love comments.

Wednesday, October 29, 2014

Canned Apple Pie Filling II & Honey Sweetened Recipe

I've improved my recipe from last year: see how many more apples are crammed in the jar! and the 'sauce' is thicker.
2013

Supplies:

7 quart jars/batch
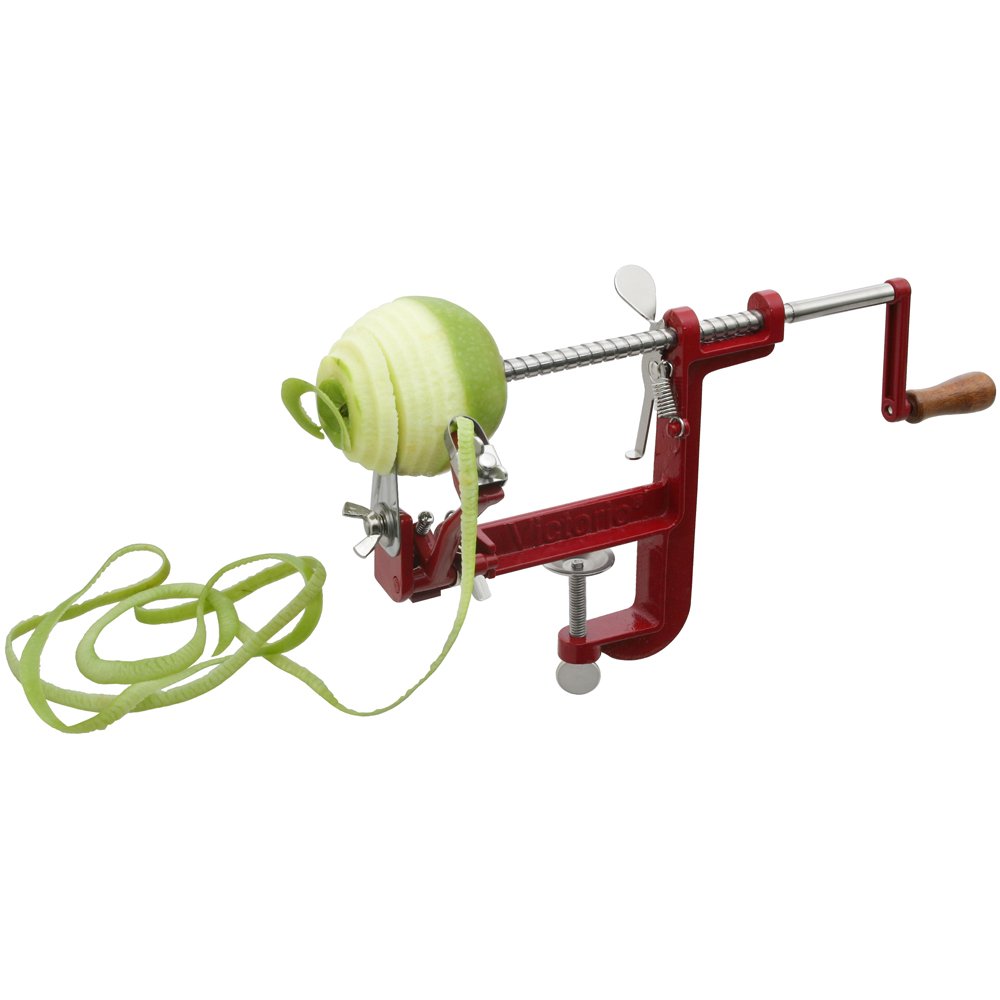
a crank apple peeler/corer
canning supplies (pot, jar lifter, lids, rings, funnel)
lemon juice
water
apples enough to fill 7quart jars 5-8 apples/jar depending on size

Process:

http://www.amazon.com/Victorio-VKP1011-Apple-Potato-Peeler/dp/B001DLP4EM/ref=sr_1_5?ie=UTF8&qid=1381779354&sr=8-5&keywords=apple+slicer+corer+peeler
Peel and core apples on a peeler/corer/slicer as seen above.  If you'd rather you can do any other preferred method but this is much faster.

Using a very large bowl pour lemon juice and water (maybe a half cup of lemon juice/quart of water). about 1/3 full (you can add more water/lemon as needed).
As each apple comes off the end of the corer, cut it in half and remove any pieces with skin, flaws, etc.  Then you will have smile shaped slices.  Save the skins in one container (puree cook them down sweeten and make them into apple butter...mmm).  Place the slices in the lemon water to wait until you process to prevent browning.

If you have someone helping (which I recommend because this is a pretty time consuming project)  Have the other person prepare the filling sauce:

Filling Recipe:

USING HONEY:
4 cups honey (I will likely use 1 cup less next time + a little extra water)
5 1/2 cups water
1 1/4 cups flour
3 tsp cinnamon (I used more spice to balance w/ the honey flavor)
2 tsp. salt (non-iodized)

In a large pot dissolve honey in the water.  Measure flour and stir in the cinnamon and salt.  Whisk flour mix into the water until smooth.  Heat until bubbling.  Reduce heat to keep warm.

USING SUGAR:
5 cups sugar
1 cup thickener (I prefer flour for a hearty apple pie--some like cornstarch for a clear jell--looks store-bought to me)
2 tsp. cinnamon
1/2 tsp. nutmeg
2 tsp. salt (non-iodized)
5 cups water *


Mix the dry ingredients in a bowl making sure to break up any flour or starch lumps.  Measure cool water in a large sauce pot, whisk the dry ingredients into the water until smooth.  Place on stove top and bring to a boil (watch closely and stir)  I do this on high so I don't have to stand around all day waiting for it to boil.  You don't want to leave it to boil or it can boil over and make a big mess of the stove (I know).

Fill the Jars:

 When you've filled a large bowl of apple slices, take a minute and prepare your jars by rinsing in very hot water or have them waiting in a hot dishwasher and fill your canner maybe 1/3 full with hot tap water.  Prep your lids by letting them sit in hot simmering or near simmering water. 

Using a funnel fill each warm jar with 1 cup of hot filling *.  The best way to measure is by following measuring marks on the jar-if they have them.  Then pack apples into the jar and push down into the filling until you get the jar filled up to just beneath the neck of the jar (1 inch head space).  It is just right when you push the apples down and the filling rises up to that level flush with the apples.  It's okay if the apples rise up a little higher after you pull your hand away. 

This is the method for filling jars I came up with because you have a consistent amount of filling and apples in each jar and very few bubbles in the jar. You will have some leftover apple filling/sauce.  You will have more or less depending on how long your pot sat there warming/evaporating while waiting for the apples.

Canning:

Wipe the rims of each jar with a clean damp cloth, top with a lid, and secure with a ring nice and tight.  Lower the jars into your canner filled with quite hot water (not boiling or even simmering).  Add cool water if you warmed it too hot.  Your filling is not very hot because of the cold raw apples, so be sure the water isn't too hot or you might break some jars.  Make sure their is 1-2 inches of water above the tops of the jars.  Bring the water to a boil and time it (process it) for 25 min. at sea level.

Be sure to adjust processing according to your altitude. I do mine for 30 min.

Altitude Adjustments for Boiling Water Bath Canner
Altitude in Feet Increase processing time
1001-3000 5 minutes
3001-6000 10 minutes
6001-8000 15 minutes
8001-10,000 20 minutes

 (chart from http://www.simplycanning.com/canning-apple-pie-filling.html -- I adapted the recipe and made up my own method after trying out the recipe/process from this site).

Carefully remove your jars with a lifter from the hot water and place on a towel to cool and seal.  Don't mess with them until completely cool or you could hamper the sealing process.

When ready to bake a pie follow the directions for your crust recipe for a filled pie.  Each jar will fill an 8" covered pie.  I always make sure to cover my edges with foil to prevent them from burning.  Because I'm lazy I often use 1-1/2 to 2 jars of filling in a 9x13" pan  to make an apple crisp (plus it's got whole grain oats instead of pastry).  We serve it warm with vanilla ice-cream.

Enjoy!


Stay tuned:.....MY APPLE SKIN APPLE BUTTER Post is going up on Sat. Nov. 1, 2014.


*changed from original recipe

Thursday, August 21, 2014

Fall is in the Air.

First day of kindergarten last year: walking to the bus stop.

Today I'm going to make some of my favorite cookies (because it's cool and wet: a great day to bake).  Plus with my six year old going back to school next week I'll need healthy treats to pack in her lunches.

Best Ever Cookies

(I've also simplified the recipe)


Grilling Obsession: My hubby bought us a new (used but new to us :o) grill this summer and I've been doing a lot of grilling.  I thought it was a ploy to get me to cook large amounts of meat (my meat philosophy).  I've actually been doing more veggies than anything. Loving grilled kebabs especially with yellow squash, mushrooms, tomatoes, and sweet onion chunks (tossed in bacon grease w/ salt and pepper before skewering).  Grilled Broccoli is also Amazing (I just marinade in Italian herbs & spices a little oil and vinegar-instead of buying a bottle of dressing).  And something new I've tried is Grilled Cabbage. It is so tasty. I usually struggle to find ways to use a whole cabbage (I'm the only one who eats coleslaw around here) but this makes it go really fast.  We had it with brats... It was really good on the brats and it would be good to top burgers too.  The grill is a great way to cook veggies.  I challenge you to try something new on the grill while you still have the chance (unless you live in a land of eternal summer).


I'm also getting prepared for my apple harvest and to do some serious canning... I love having pie filling in the cupboard so I can quickly throw together a tasty apple crisp.  I'll also be making a whole lot of apple sauce and apple butter.

Tuesday, May 27, 2014

OUR KIDS NEED DADS

Sometimes moms think they can do it all... but honestly we can't.... No matter how awesome a mom is, she can't replace a DAD!

Some of my fondest memories were wrestling with my dad... racing him... running as fast as I could, hanging from his incredibly strong biceps, being flung into the air and, caught in his arms.  He taught me to take risks, to challenge my safety net, and to even be reckless sometimes... These things are a bit outside of my nature and I needed his push to do things that were challenging.

Dad's have hard jobs, they have to go out in the world, compete in a sometimes ruthless and harsh world (and yes I know many women do too).  But they summon up the strength and push forward defying all the critics and the all the forces that could, and often do, combine against them.  Sometimes dads are riskier playing with their kids and sometimes we'd get hurt... but it was worth the risk.  We survived and the experiences we gained were priceless.  Sometimes men ignore risks and/or don't weigh all the possibilities of what could go wrong... but as a man working in a dog eat dog world... sometimes you have to slap on your big boy pants imagine that you're invincible, forget about the risks, and go for it.  Sure it might be terrifying but that's the essence of manhood.  And time and experience has proven to me that all those cliche phrases like man-up and take it like a man are well founded.

I always compared my Dad to Popeye because I thought he had such incredibly strong forearms... Yet he was not one who encouraged us to eat our vegetables.

Wednesday, May 7, 2014

I LOVE MY MOM: lessons my mom has taught me.

I had a rough mom day yesterday.... blowing up and screaming at my kids who seemed hell-bent on defying me.  Times like that you seriously question why you work so hard and whether it's worth it all.... At the moment it doesn't seem like it.
  But it
 

is
 
so
worth every minute of it!

Tuesday, April 15, 2014

Understanding Easter on a Deeper Level

image source
I know there are so many things to do around the holidays.  Easter is such an important holiday, but too often we get caught up in the Easter Bunny stuff and all the excitement for spring that we don't think about the deepest most important reason we celebrate this holiday.

Christ lives, yes he died for our sins, but he rose again.  We can live again and because of his atonement we have the power to rise above our sins, faults, weaknesses, and all the failings of mortality.  The Church of Jesus Christ of Latter-day Saints created this video to remind us:


Also visit: http://easter.mormon.org/ for more links and information regarding the importance of Easter.  I hope we can share this message with our children this Easter.


This is also a beautiful Message about Easter and the meaning of Christ's atonement in our lives:

http://startingtoday.radiant.org/

I love the purpose of this site:
#StartingToday Campaign Encourages Change
Christmas is a time of good will toward others. New Year’s inspires resolutions. But how does Easter go beyond the superficial themes of Easter eggs and chocolate bunnies? That question is the focus of the new YouTube video, “Starting Today.”
Radiant, a new values-based content provider owned by boncom, will premiere the thought-provoking message for Easter this Saturday. Starting Today will inspire viewers to take a closer look at their lives and make positive changes.
“The central message of the video is that change can begin at any time because of the resurrection of Jesus Christ—the defining event of Easter,” Brandon Burton, the president of boncom, explained. “His life and teachings give us the hope and the help to bring about real, positive change in our lives.”
Starting Today isn’t just an inspiring short film. It’s a holistic campaign encouraging viewers to post personal resolutions on social media with the hashtag #StartingToday.
Radiant hopes that by sharing the video and their resolutions, social media users will inspire their friends and family to take action, too. startingtoday.radiant.org (http://apartirdehoy.radiant.org/ in Spanish), a Radiant -sponsored website, provides some suggestions for positive change, such as “forgive more” and “strengthen relationships.”
Radiant is dedicated to producing engaging, uplifting content. By creating great media experiences based on the time-honored virtues of integrity, morality, and human kindness, Radiant aims to help strengthen families, build faith, promote service and inspire greatness.


Starting today I will more consciously testify of truth to strengthen and inspire those around me.


I know that Jesus Christ is my Redeemer and Savior.  I am grateful for the hope he brings to my life.  He loves all of us beyond our ability to comprehend.  He understands all of our struggles and hardships.  He knows.  He is there for us. Through him, we have the power to overcome anything.  Amen.

Christ's atonement is so important in our lives.  I recently watched this devotional on the Atonement.  I know I've understood different parts of this message at different times in my life, but this one talk really helps to bring it all into perspective. It's so inspiring and eye-opening.

Monday, April 7, 2014

Patchwork Fabric Eggs

Want to make some awesome Easter eggs this year?  Here are 4 different ways to make some awesome eggs.

This year I decided to do more of my patchwork eggs.  They make cute gifts, are adorable, and durable.

Eggs I did this year

Friday, April 4, 2014

Why Won't the LDS Church Ordain Women?

image source
I don't usually address super-controversial subjects on my blog, but I recently had a moment of clarity regarding the issue over women holding the priesthood in the LDS Church.  I felt a strong need to share.


Regarding the Ordain Women Movement: The Lord has designed the church to meet the needs of his children. If it wasn't meeting our needs, I'm sure counsel would be given to change it. I can see why changes were made so blacks could receive the priesthood. The growth of the church in predominantly black areas warranted a need for such change. I suppose if the majority of men in the church were not fulfilling their priesthood responsibilities, then the Lord would find a way to bring the blessings of the priesthood to the people of the earth (that might mean ordaining women).


 I feel that we need to have a little more faith in our priesthood holders. I don't feel that the demands of the priesthood are more than they can handle. If women feel so strongly that they (or others in the church) are unable to receive blessings of the priesthood, they should be pleading to the Lord for an answer. I would hope their spouses, fathers, home teachers, or priesthood leaders could help fill that need.

 If the current system was suddenly unable to further the work of the Lord, then yes I suppose He would (through his prophets) make changes in the church. I do believe that the church is not a democracy but it is His church. We need to have faith in His divine plan: He will insure that His work (the salvation of his children) WILL continue forward (which is the point of having an organized church in the first place). This is my testimony on the matter. Amen.


I know my blog is called Do-It-Yourself Mom
I don't mean that every mom should do everything alone (although there are many things we can). For some things we must rely on each other.  Sometimes this takes great faith and humility.  I've often heard the saying 'No man is an island.'  Well, no woman is either


If you want further information LDS.org has several articles about the topic.
These 3 in particular:
Mormon.org: Why Don't Women Hold the Priesthood in the Church?
Women and the Priesthood
Church Asks Activist Group to Reconsider Plans to Protest at General Conference


Tuesday, March 18, 2014

Move Over McDonald's: My New Favorite Breakfast

(Not that my favorite breakfast was ever from McDonalds this dish just reminds me of the McGriddle--although it's so much better.)

Okay so recently I discovered this ingenious idea of putting precooked crumbled sausage (which I keep in a ziploc bag in my freezer) in my pancake batter. They are so much tastier and better than chocolate chips...plus I love syrup on my breakfast meats.  Today I took it to the next level... Adding cheese.

SAUSAGE CAKES WITH CHEESE

The process goes like so... take a bowl of your favorite pancake batter (like my new favorite: Whole Wheat Pancakes).  Add a few handfuls of crumbled breakfast sausage (I've used venison and turkey and they are both tasty).  Fold in.  Spoon onto hot griddle (300-350 degrees F). 

Turn with a spatula once bubbles start popping on the surface of the pancakes.


Add some cheese to half of the pancakes (I used Colby Jack because I have it and it's super gooey).

When cheese is all melty and pancakes are fully cooked stack a non-cheesed sausage cake on top of the cheesy one and drizzle with syrup.  If you want a less messy version (for the kiddos or for on the go) add the cheese right after removing from griddle and dip into syrup on the side. This is how Caleb prefers to eat his pancakes, although he was a little wary of the cheese concept.  You can also just let the hot gooey sandwich set for a minute and eat it by hand when the cheese sets up.

I first tried my maple/molasses syrup but decided that chokecherry syrup was much tastier.  I live in the chokecherry capital of the world, so I have my own but a friend of mine sells it.  Check out her FB business page Vintage Delights.  Her Chokecherry Chocolate syrup is also amazing on almost anything you can think to put it on.

The variations are endless... you could use any breakfast meat (like cubed ham or bacon pieces)  any cheese (like medium cheddar or even feta) and top it with anything you like (any flavor of syrup or even a chile sauce or salsa for a southwest kick).

ENJOY! 


Tips on making the Pancakes:  I whisk the egg, add the milk and vinegar, and then whisk in the warm melted butter (don't add the hot butter straight to the egg or else it will cook it).  I've made these enough that I have the batter ready by the time the griddle is hot. The recipe makes enough to feed 2 hungry adults.  I usually double the batch and have some for me and my kiddos with quite a few extras to keep in the fridge.  My husband is not a big breakfast or pancake fan but he snitches them (since I've been making them with sausage) out of the fridge and eats them cold.  If he doesn't devour them for lunch or a late night snack we zap them in the microwave (about 10 seconds/pancake) and have them for breakfast another day.

You could also cook up like 3 batches and freeze them (wait til they're cooled or the steam will cause them to freeze together.)  Then you can have a super tasty easy breakfast in a flash any day of the week (no need to buy those pre-packaged over-priced breakfast sandwiches).

Wednesday, December 4, 2013

Leftover Turkey?


My all time favorite leftover turkey recipe is this excellent Curried Turkey Salad

Curry, Craisins, and Turkey.... so tasty.  I'm going to chop up some turkey and freeze it until I get some craisins (plus I've been eating a lot of turkey lately).  For the chutney (which is hard to come by in the west) I've used a generous measurement of whole cranberry sauce, mincemeat, or apricot jam.  I'll likely use some tart chokecherry jam that I made this year.
Here's also a link on making your own curry.

I recently made some  

Black Bean 'n' Pumpkin Chili 

It is some excellent chili but it doesn't taste super pumpkin-y but the pumpkin gives it a nice thick and smooth texture.  The second time I made it I used a large double can of pumpkin and I left out 1/2  of the chili and cumin (because it was a little spicy for the kids).  Made it for about 10 people (8 adults 2 kids) and they certainly polished it off.  Served with shredded cheddar cheese and tortilla chips.

 What are your favorite ways to eat leftover turkey? (besides with leftover stuffing and cranberry sauce...mmm).  Please share your recipes in the comments below.

Monday, October 28, 2013

Tips for Baking the Perfect Idaho Potato

I did most of my growing up in SE Idaho.  I know this post is a little late in the season... all the potato harvesting is done by now but this fall weather is perfect time for baking potatoes (especially to go with a meatloaf...).  I am kind of a potato nazi;  I can't stand a poorly baked potato, and I always eat my potato skins!  That's where all the fiber and protein is.

Tips for Baking the Perfect Potato: (much of this info I gleaned from a random un-cited handout but some of it I know is from the Idaho Potato Commission)
Never bake Idaho potatoes in aluminum foil.  Foil seals in the moisture and steams the potato, making the texture pasty instead of dry and fluffy.  Aluminum foil can be applied after baking, however, to hold the serving temperature longer. 
Scrub the potatoes well, and dry them thoroughly.  Prick with a fork in a few well placed spots (or try rubbing the potato with oil before baking, instead of pricking the skins).  This allows the steam to escape.  Medium sized potatoes should be baked in a 425 degree oven for 55 to 65 minutes or baked in a 350 degree oven for one hour and 25 to 35 minutes.  Higher heat gives darker, crisper, skins with fluffier interiors.  Potatoes are done when a fork slips easily in and out.
 Becoming a connoisseur: You can tell an Idaho potato connoisseur because he or she will never open a baked potato with a knife.  Instead, the connoisseur will poke a zigzag pattern into the top of the potato with a fork, then will press the ends of the potato together to open or "blossom" the potato.  The connoisseur recognizes that the blade of the knife flattens the surface and alters the fluffy texture of the properly prepared Idaho potato.

Celebrate Spud harvest by making delicious perfectly baked potatoes!

PS-If you ever get the chance visit Shelley, ID about the 3rd Saturday in September for the Annual Spud Day!  They serve free baked potatoes with a milk box, and you can watch people do a tug of war over a giant pit of mashed potatoes (plus all sorts of entertainment, a parade, contests, good food and vendors).

Sunday, October 20, 2013

Excellent Pumpkin Cake with Light and Creamy Frosting

I made this cake and took it to church for a potluck dinner. I got rave reviews. The recipe was easy so I wanted to be sure to share it.


I started with a Pumpkin Cake I found on Allrecipes  I altered it a little, so here's my version.

Pumpkin Cake III

2 cups white sugar
1/2 cup vegetable oil
3/4 cup applesauce
1 tsp vanilla extract
2 cups canned pumpkin (or a 15oz. can) or cooked & pureed pie pumpkin
4 eggs
1 1/2 cups all-purpose flour
1/2 cup white whole wheat flour
3 tsp baking powder
2 tsp baking soda
1/4 tsp salt
2 tsp ground cinnamon
1/2 tsp ground cloves
1/3 tsp ground ginger 

Directions (from Allrecipes)

  1. Preheat oven to 350 degrees F (175 degrees C). Grease and flour a 12x18 inch pan. Sift together the flour, baking powder, baking soda, salt, cinnamon, cloves, and ginger. Set aside.
  2. In a large bowl combine sugar, oil, and applesauce. Blend in vanilla and pumpkin, then beat in eggs one at a time. Gradually beat in flour mixture. Spread batter into prepared 12x18 inch pan.
  3. Bake in the preheated oven for 30 minutes, or until a toothpick inserted into the center of the cake comes out clean. Allow to cool.

FROSTING 

Found in a Facebook share from this gal: https://www.facebook.com/melody.mclaughlin1 ---she has lots of good looking recipes on her wall...) 
---------------------------------------------------------------------------------------------------------------
EASY HOMEMADE WHIPPED CREAM FROSTING

This is SOO delicious. It WONT melt at room temperature like regular whipped cream!
It's VERY stable. Its wonderful used for frosting a cake or even dipping fruit in it! Not TOO sweet.
Very versatile!

**This recipe makes 5 cups**

1 (8 ounce) package reduced-fat cream cheese, softened [I used neufchatel)
1/2 cup white sugar [yes regular granulated sugar]
1 teaspoon vanilla extract
1/2 teaspoon almond extract [I used orange extract because I didn't have almond on hand]
2 cups of heavy cream

Directions:

Combine the cream cheese, sugar, vanilla extract and almond extract in a large mixing bowl or the bowl of your mixer.

Once all in the bowl, mix on medium speed until smooth.

While the mixture is still whipping, slowly pour in the heavy cream.

Stop and scrape the bottom of the bowl a few times while you continue whipping until the cream can hold a stiff peak.
---------------------------------------------------------------------------------------------------

I slathered this over the sheet cake and then using a star frosting tip did a zigzag border around the outside edge.  Simple yet so tasty.  I'm not sure if this frosting is sturdy enough to hold up a multi-layer cake, but if you try it out let me know.

ENJOY!

Monday, October 7, 2013

Pregnancy Woes: Veins Part 2

I wrote about this a couple months ago.

Pregnancy Woes: Veins

I've been trying my best to deal with my vein issues.

I'm all about prevention and I wish I knew more about veins before my pregnancy.  If varicose and spider veins run in your family I would be prepared to deal with them during pregnancy.  I would take supplements for it before you see anything just to improve your vein elasticity and health.  If you see any signs of vein damage get some compression on them ASAP (if I had ace bandages I would have wrapped the affected area while I waited for my stockings in the mail).

Risk Factors For Varicose Veins [http://www.nashvilleveincenter.com/what-causes-varicose-veins/]

  • Sex – Varicose veins affect more women than men.
  • Hereditary – It is a hereditary condition.
  • Obesity – Obese people are at a higher chance of developing varicose veins.
  • Pregnancy – Pregnant women are more likely to develop varicose veins. This is probably because of the higher volume of blood in the body that burdens the circulatory system. In these women, the varicose veins may disappear after delivery. [this was my experience with my last pregnancy I only slightly found one bulge near the end of my pregnancy and it faded. Hopefully my new ones will fade too.]
  • Age – With increasing age, the walls of the veins weaken and lose elasticity.
  • Certain jobs/careers – Long periods of sitting or standing at a job can raise the likelihood of developing varicose veins.

A leg exhibiting spider veins
http://ohiovein.com/spider.html
varicose-veins3
http://www.nashvilleveincenter.com/what-causes-varicose-veins/


So when I first wrote my other post I had a few bulges in my thigh and behind my knee of my right leg.  They are varicose veins.  They look like twisted and knotted veins under the skin.  Mine look kind of like the image with the greenish background although less defined and on my inner thigh. I don't want to share pictures of my own legs at this point...

Shortly after I started taking my supplements I started getting spider veins on my calf (kind of like the image above right but mine look like 3 bruisy splotches) .  They are not just itchy but when they get bad at the end of the day they are a bit painful.

I ordered some compression knee high socks... they definitely help.  I think wearing the compression helps prevent further damage and helps them to heal.  If I could stand the heat of wearing full pantyhose in August (or if I had AC) I would have worn them all the time.

I bought these knee highs at discountsurgical.com (best prices I found on the web) they are the value brand and I think they work just fine and I really feel the difference when I'm on my feet all day. I ordered medium 15-20mmHg in nude and the color was a little pale/cool... depending on what I wear with them it's less noticeable, but wearing a knee high sock I'm not showing much leg.  They are very snug and stiff so I found wearing them in flat shoes gives me a crease at the ankle... looks old and frumpy.  So if I wear them with a skirt or dress I wear a 1 1/2 - 2 inch heel and I don't have the issue.

I also ordered some full maternity pantyhose so I can address my thigh issues too.  I also ordered them in nude but the color looks a lot better (warmer color) than the knee highs.   Now because of my height (5'8") I just barely fell in the Lg category on the size chart (use pre-pregnancy weight).  I almost considered ordering the Med. because I'm vain and I worried that the they would not squeeze my scrawny calves very well... I am GLAD I went with the larger size because I am tall.  When I first wore them around 30 weeks or so, they didn't feel tall enough in the torso and they felt like they were actually pulling my pregnant belly down... This also added to that breathless feeling I was getting at that time in my pregnancy.  Luckily after my baby dropped (his head is right at my pelvic bone) they became much more comfortable and since the weather began cooling off, I wear them much more often.

Before the weather cooled I also ordered these: I figured they would let my feet breath and I could wear them with just about anything. The only issue is that I have pretty full thighs and some saddle baggage so I get a little bulge above the top band... so I don't wear them with yoga pants or slim fitting clothing but I wear them under jeans all the time.  I would prefer these in a medium compression but they only come in firm compression.  When I wear them I have occasionally noticed some edema (swelling) in my feet by the end of the day.  I like having these as an option because they are cooler than having my feet and belly covered in synthetic fabric... they are also kind of cottony but still slightly sheer.----UPDATE... one day I wore these and my feet swelled up pretty bad... with pregnancy edema is also an issue.  Since then I only wear them with nice snug socks.

I also ordered one pair of white knee-high athletic socks.  I actually got a different pair than I ordered.  They sent me some Mojo (a name brand) socks.  They have their name in black at the top and on the soles... I love these socks and plan to wear them all the time even after pregnancy (they feel so good on my calves and feet... giving them a constant hug).  They are not sweaty like nylons and just very stretchy and easier to put on.  I always am sure to keep my calf spider veins compressed or else they get worse.  I've been keeping my calves compressed all day and they are showing a lot of improvement.  I wear these socks if I'm planning on taking it easy during the day and I'm not on my feet too much (because they don't cover my thigh veins).

I hope that my supplements are improving my vein health but now that I already have these ugly veins and I have the extra pressure on my veins because of pregnancy I feel that the compression is necessary to help my veins heal properly.  My spider veins are actually getting much better... which is really saying something since I'm even further along in my pregnancy.  The itchiness is also decreasing... I think it's that itch you feel when something is healing.

Tuesday, October 1, 2013

Controlling Eczema: Bleach Baths...


Okay, so you may be very skeptical of this post.  I was when I stumbled upon an article about Eczema and the mother mentioning this.

 http://health.howstuffworks.com/skin-care/beauty/skin-treatments/bleach-cure-eczema.htm 

I thought... hmmm that's interesting.  I was becoming frustrated with my 2-1/2 y.o.son's eczema early this spring and was getting frustrated because I knew that he was getting a lot of secondary infections from the inflamed skin, so just moisturizing as his pediatricians constantly suggested was not cutting it.

My husband often suffers from athletes foot, I don't know what it is but he was getting it this spring (most likely from an old pair of boots that he wears on outings--that increase in frequency in the spring). He uses the same bathtub that the kids bathe in.  I was noticing that DIY-son's common eczema patch under his knee (usually flares up when the weather warms up--from sweat/or irritation or just wearing shorts) was looking patchy like a fungal infection. See image below.  His has never gotten this bad but I could see raised borders and circular patches.
source: http://www.pennmedicine.org/encyclopedia/em_PrintArticle.aspx?gcid=000877
 So I started putting Clotrimazole Cream (name brand Lotrimin-original formula) on his itchy patches... Oh they really itch him (especially when he sweats or goes more than a couple days between baths).  But,  I worried that every time I bathed him he was getting re-infected and often scrubbed the tub before bathing him. And because we have a rubber mat in this bathtub at our new home (no texture on the bottom of the tub) I was trying my best to scrub it too and to be sure everyone draped it to dry off between use.  It was becoming such a pain and I was getting so paranoid that this vicious cycle would never end.


I started searching on the web for ways to treat/prevent eczema and preventing/treating secondary infections.  I stumbled on that first article then I looked for more articles on bleach treatments and found this article that describes studies that were done.

http://www.webmd.com/skin-problems-and-treatments/eczema/news/20090427/bleach-baths-may-help-kids-with-ezcema

I thought I would give it a try, so I measured about 1/4 cup of bleach into his baths about half full and I felt so much better about the rubber mat and all the fungus it could be harboring... My daughter thought it was fun because it seemed like they were at the swimming pool.  I bathe him first and then I add more hot water (to warm it up more and she likes a deeper bath) before my daughter gets in.  Then her bath is much more diluted.

Within a couple days I was seeing results and his flare ups actually went away for much of the summer.

Our Regular Routine:
I bathe my son about every other day (about 3-4 times a week) If/when my son would get a patch under his leg or around his wrist I found it helpful to scrub the patches with a washcloth and mild soap while in his bleach bath to help remove and break up the rough dry and flaky skin.  Then following his bath I apply the anti-fungal cream first (if the flare-up has lasted a while and I suspected a secondary infection---which are becoming much less often) and then I use Aveeno extra dry skin lotion or an eczema cream (see my earlier recommendations).  I apply the lotion especially to his limbs and a little on his face (using a good water-barrier type lotion after each bath really helps strengthen his sensitive/delicate skin and prevent flare-ups).

The best part is, I generally only feel the need to scrub the tub about once a week!

Seriously adding a little bleach to my son's baths have really made a difference in our lives.  I wish I had started it when he was younger... (I'm not sure how early you may want to do this... maybe after 8 months or so... or when they start bathing in the community bath tub starting with very little bleach).

If his skin is looking really good I often don't bother with a bleach bath and maybe only do it once a week.  Eventually I'm sure he'll grow out of his eczema like his sister did (although hers was more mild).

For now, this is really making a difference and if your child is suffering from eczema it's worth a try (not like we never take our children to a chlorinated swimming pool---- which some people notice clear up eczema and acne conditions too).

Please share this with mothers that have eczema tortured children... I wish someone had shared it with me long ago.

Let me know if it helps!

DIY-Mom

Wednesday, August 7, 2013

Pregnancy Woes: Veins

Did you know that pregnant women have a whole lot more blood.  This is what my hand looks like when I'm pregnant.  This pregnancy (#3) has been giving me problems with veins in my lower body... I guess I'm used to seeing vein-y hands.  They look so much like my mom's.  But I don't find it at all pretty on my calves and thighs.  I generally don't experience pain with them but I don't like the way they look.


Thursday, August 1, 2013

Canned Apple Pie Filling

I have scoured the internet and tried several different methods.  Between me and my neighbor, we find this to be the best recipe and method.  TRY MY IMPROVED RECIPE

There are bubbles in the top because I shook them up for the photo (not because it's runny).

Supplies:

7 quart jars/batch
a crank apple peeler/corer
canning supplies (pot, jar lifter, lids, rings, funnel)
lemon juice
water
apples enough to fill 7quart jars 4-7 apples/jar depending on size

Process:

http://www.amazon.com/Victorio-VKP1011-Apple-Potato-Peeler/dp/B001DLP4EM/ref=sr_1_5?ie=UTF8&qid=1381779354&sr=8-5&keywords=apple+slicer+corer+peeler
Peel and core apples on a peeler/corer/slicer as seen above.  If you'd rather you can do any other preferred method but this is much faster.

Using a very large bowl pour lemon juice and water (maybe a half cup of lemon juice/quart of water). about 1/3 full (you can add more water/lemon as needed).
As each apple comes off the end of the corer, cut it in half and remove any pieces with skin, flaws, etc.  Then you will have smile shaped slices.  Save the skins in one container (puree cook them down sweeten and make them into apple butter...mmm).  Place the slices in the lemon water to wait until you process to prevent browning.

If you have someone helping (which I recommend because this is a pretty time consuming project)  Have the other person prepare the filling sauce:

Filling Recipe:

5 cups sugar
1 cup thickener (I prefer flour for a hearty apple pie--some like cornstarch for a clear jell--looks store-bought to me)
2 tsp. cinnamon
1/2 tsp. nutmeg
2 tsp. salt
7 cups water

Mix the dry ingredients in a bowl making sure to break up any flour or starch lumps.  Measure cool water in a large sauce pot, whisk the dry ingredients into the water until smooth.  Place on stove top and bring to a boil (watch closely and stir)  I do this on high so I don't have to stand around all day waiting for it to boil.  You don't want to leave it to boil or it can boil over and make a big mess of the stove (I know).

Fill the Jars:

 When you've got a large bowl of apples filled take a minute and prepare your jars by rinsing in very hot water or have them waiting in a hot dishwasher and fill your canner maybe 1/3 full with hot tap water.  Prep your lids by letting them sit in hot simmering or near simmering water. 

Using a funnel fill each warm jar with 1 1/3 cup of hot filling (I use a 2/3 cup twice).  Then pack apples into the jar and push down into the filling until you get the jar filled up to just beneath the neck of the jar (1 inch head space).  It is just right when you push the apples down and the filling rises up to that level flush with the apples.  It's okay if the apples rise up a little higher after you pull your hand away. 

This is the method for filling jars I came up with because you have a consistent amount of filling and apples in each jar and very few bubbles in the jar. You will have some leftover apple filling/sauce.  You will have more or less depending on how long your pot sat their warming/evaporating while waiting for the apples.

Canning:

Wipe the rims of each jar with a clean damp cloth, top with a lid, and secure with a ring nice and tight.  Lower the jars into your canner filled with quite hot water (not boiling or even simmering).  Add cool water if you warmed it too hot.  Your filling is not very hot because of the cold raw apples, so be sure the water isn't too hot or you might break some jars.  Make sure their is 1-2 inches of water above the tops of the jars.  Bring the water to a boil and time it (process it) for 25 min. at sea level.

Be sure to adjust processing according to your altitude. I do mine for 30 min.

Altitude Adjustments for Boiling Water Bath Canner
Altitude in Feet Increase processing time
1001-3000 5 minutes
3001-6000 10 minutes
6001-8000 15 minutes
8001-10,000 20 minutes

 (chart from http://www.simplycanning.com/canning-apple-pie-filling.html -- I adapted the recipe and made up my own method after trying out the recipe/process from this site).

Carefully remove your jars with a lifter from the hot water and place on a towel to cool and seal.  Don't mess with them until completely cool or you could hamper the sealing process.

When ready to bake a pie follow the directions for your crust recipe for a filled pie.  Each jar will fill an 8" covered pie.  I always make sure to cover my edges with foil to prevent them from burning.  Because I'm lazy I often use 1-1/2 to 2 jars of filling in a 9x13" pan  to make an apple crisp (plus it's got whole grain oats instead of pastry).  We serve it warm with vanilla ice-cream.

Enjoy!
Related Posts Plugin for WordPress, Blogger...